General Preferences: Movement
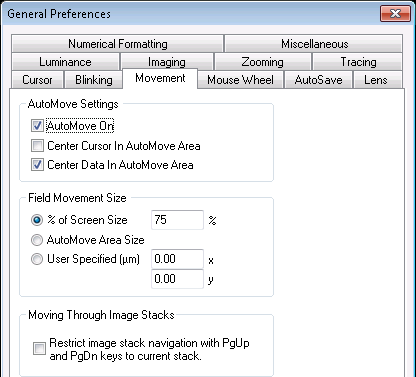
AutoMove Settings
- AutoMove On: You can also use Move>AutoMove or the icon
 to enable AutoMove.
 - Center Cursor in AutoMove Area: Repositions the cursor to the center when AutoMove is used.
- Center Data in AutoMove Area: Use the center of the AutoMove area instead of the default (center of the tracing window) when repositioning the stage.
- The two centers can be different since the AutoMove area may not be centered in the main tracing window.
- If the video image does not take up the entire tracing window, the AutoMove area is centered over the image; video images are placed in the upper left corner of the tracing window. Depending on the size of the video image, centering data in the AutoMove area may be a better method of handling automatic stage movements.
Field Movement Size
Use to control how the stage is moved (or to navigate acquired images) when using either the arrows  in the toolbar, Move>Field, or Move>Meander Scan.
- % of Screen Size: The amount of movement can be set to a fixed percentage of the size of the tracing window.
- The default is 75% of the size of the tracing window; this size typically balances overlap with efficiency in covering an area.
- Enter a value between 10 and 100%; for values outside of this range, use the User Specified option.
- AutoMove Area Size: Set the Field Movement Size visually.
- Movements in X are the same as the width of the box and movements in Y are the same as the height of the box.
- With this option selected, click Move>Define AutoMove Area to set the Field Movement Size.
- User Specified: Unlike the previous options, the values entered might not be applicable to all lenses because they are absolute values.
Moving through image stacks
- Restricts navigation to the current stack.